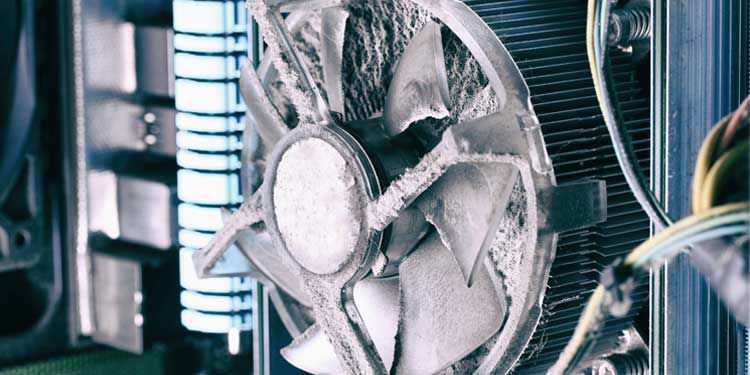
Dust may accumulate in your computer over time and prevent the heat sink from working correctly. This will make it difficult for your CPU to cool itself down, causing a CPU fan error. Fortunately, you can fix this issue on your own without calling a technician.
What Is a CPU Fan Error?
A CPU Fan Error occurs when your system has an issue with one or more of its fans not spinning correctly, which can cause it to overheat and shut down unexpectedly. Your computer may have a faulty motherboard, broken wires, or other internal malfunctions that are preventing air from circulating correctly within your device. You could also be experiencing a more common problem with your system, which is simply dust buildup. A CPU Fan Error will cause your computer to turn off without warning and can be very frustrating if it occurs in the middle of an important task or presentation. To troubleshoot your fans when not spinning, first ensure that nothing prevents the fan blades from turning, such as loose wires, cable ties, or even dust.
How the CPU Fan Error Appears
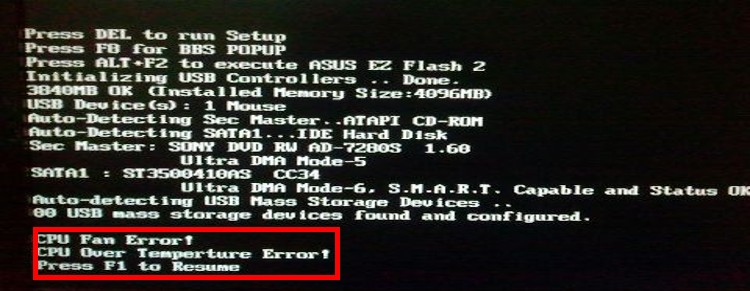
CPU fan errors typically appear during a startup or boot process in Windows. These types of errors display a message such as: .
What to Do When CPU Fan Error Appears
If the CPU fan error appears, try to turn off the computer as soon as possible. Unplug all cables attached to it if you see smoke or sparks coming from the machine. If you can shut down the system quickly enough, your data will still be intact, and it should allow you time to repair or replace your cooling device.
How to Fix a CPU Fan Error
CPU fan errors can be resolved in several ways. The first step is to make sure that your computer is clean and free of dust buildup. Also, check your power supply connections because the fan will not work without an electrical current passing through it. If you’re experiencing a CPU fan error, then it might be worth taking apart some critical parts of your device and cleaning them off to remove excess debris. If your fan is not getting power, the problem could be a blown fuse, inadequate power supply, or incorrect wiring. The best thing is that you can check these things by yourself if you know how to take apart and reassemble your computer.
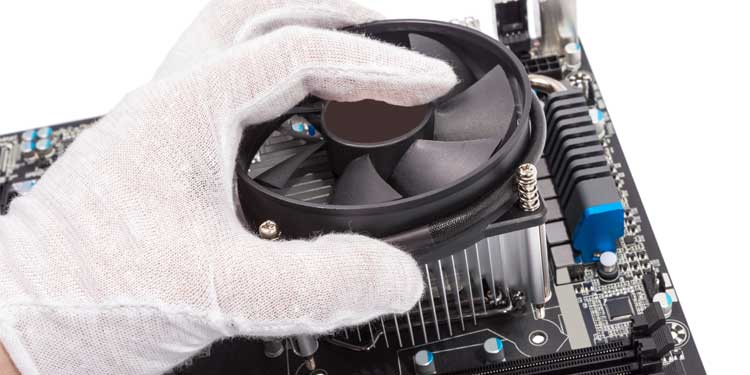
Fix 1: Clean Your PC / Laptop
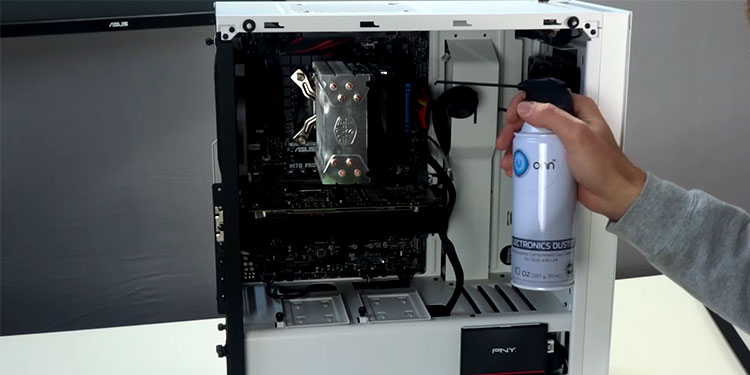
Too much dust, cat hair, or even human hair (don’t ask) can cause a CPU fan to malfunction. To clean your fan, you can use compressed air. As a first step, simply blow the air through the fan holes in your computer or laptop. If you see a lot of dirt coming out, rotate your computer the other way, and repeat the process. Always do this after turning the computer off and disconnecting it from the electricity. It is important to start with the ventilation holes. After nothing more comes out, you should also blow some compressed air through other openings. For a laptop, this includes the keyboard. Important places to keep clean are USB entrances, HDMI and Network entrances, and carefully, the electricity input.
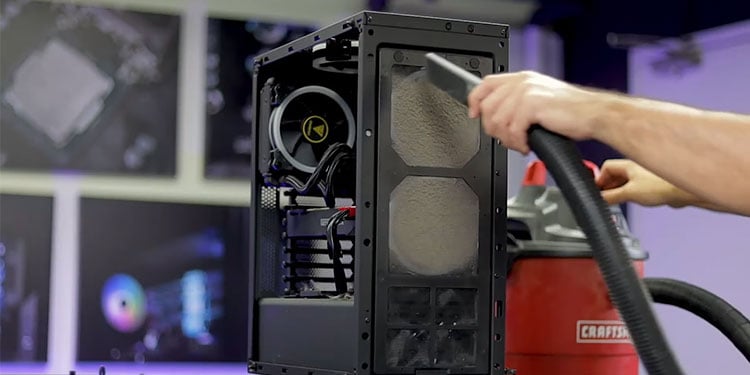
Fix 2: Deep Clean Your PC / Laptop
After a surface clean as seen in fix 1, you can restart your computer to confirm the fix worked. Most of the time, this will be the case. In the rare instances it’s not, you’ll have to open the case to do a deep clean. If you do not have the technical experience, it may be better to bring your equipment to a professional. They know what they are doing and can also review other hardware issues for you at the same time. If you want to do it yourself, be very careful, and prepare:
Clean Table or Desk
This means no dust, no food, and definitely no drinks. Try to have the workspace as empty as possible to avoid losing small items.
A Bowl or Plate
The screws you are working with are tiny and it is best practice to place them in a cup or a bowl. This will ensure you can find them when you need them, and will stop them from rolling off the table.
Good Light
Having a good light is important so you can see what you are doing.
No Animals Around
Cats love to play with tiny little screws and smash them off the table. Ask me how I know… They will also shed hair, when what you want is a clean environment. Very important to always use an antistatic device. If you are static and touch the computer, it can erase all your data. Once you are ready, use the right size screwdriver to detach the cover of your laptop or PC. Carefully lift it off and locate the CPU Fan. Using the same compressed air, remove all dust and dirt from the fan blades. Try to not have any fall inside of the computer case. If it does, gently blow it away with more puffs of air. Do the same with the fan intake and exhaust. Be careful to not touch anything inside the computer case since the oil on your skin can cause chips to break. Once you visually confirm the fan is clean, place the cover on your computer and close it. This is a step that cannot wait, since the longer the interior sits in the open, the more dust and dirt will collect inside. Reconnect all the cables and turn your computer back and your fan should run smoothly again.
Fix 3: Move Your PC or Laptop
If you are sure your CPU fan is clean, and yet you keep getting the CPU Fan error, there is a simple fix. You may have to move your computer to a different location.
Your Current Location Can Be Too Warm
An ideal place for your computer is somewhere where there is not a lot of external heat. It is important that the hot air can move away from the computer. If you have your computer in a cabinet, it needs to be ventilated. While working and looking outside is lovely, the hot sun can cause a CPU fan to work overtime as well. Make sure that your computer sits in the shadow, and try not to work in direct sunlight with your laptop.
Your Current Location Collects Too Much Dust
If your fan keeps getting dirty and in need of a cleaning, you may want to consider moving your computer as well. Placing your equipment in a well-ventilated cabinet will protect it from dust and animal hair. If this doesn’t fix the problem, several things could be causing it:
Broken wires or faulty motherboards can cause your computer’s fans to stop spinning. You will need to take it to a professional for repairs if this is the case.A software issue may be causing an error as well. This type of problem can be fixed easily by updating your computer’s software.
How to Fix CPU Fan Not Detected Errors on Boot
This could be due to your motherboard, PSU, or fan. Remember that your BIOS is there to support your computer’s cooling needs. If you don’t properly adjust the settings within BIOS and use the correct connectors on your motherboard, you are failing to cool your PC properly and could be causing errors when you boot. Attempt the steps below to locate exactly where the problem is.
Verify the CPU fan is connected properly.Open your computer case and examine the fan while the computer is turned on.Ensure that the fan is turning and operates as it should.Verify that the CPU fan is plugged into the correct header on your motherboard. It is generally close to the CPU located on the motherboard labeled CPU_FAN1. If you do not use the right connector, your CPU fan will not be controlled by the BIOS and will not function properly.If it still doesn’t work, try using the fan on another computer. If the fan starts to spin, it could indicate you have a faulty connector on your motherboard.
There are a couple of other ways to test your fan. One way is using a multimeter to test the voltage of both red and black terminals from the PSU connector. Set your multimeter to test dc volts while holding the black and red test leads on the end of the motherboards + and – pins of CPU_FAN1 connector. You should get around 12 volts on your multimeter. If it is lower or not registering, the motherboard connector has failed. You will need a new motherboard for the BIOS to control the CPU fan. The other way is to use a 9-volt battery and take two wires touching them to the red + and the black – of the battery to the red and black wires on the fans connector. If the fan starts to spin, this will verify that the fan is working properly and the problem lies with the motherboard.
How to Fix a CPU Fan Speed Error
The fan must turn at the appropriate RPM (revolutions per minute) to properly cool your CPU. Your BIOS will allow you to change this factor by setting alarms if the fan turns too slowly, typically at 200 RPM or less. If your BIOS is giving you errors it may be indicative of its RPMs. You have the capability of lowering the RPMs within BIOS, simply follow the steps below:
Shut down your PCPress F1, F10, or the Delete immediately depending on your chipset and enter BIOS.Enter Advanced SettingsLook for CPU fan RPM alertsThe default value is 600 RPMs. Lower this to 200 RPMs and SAVE changes.Exit the BIOS and restart the computerWorking within BIOS, you can reset to default by removing all cables and the CMOS battery. Then press and hold the power button for a minimum of 30 seconds.
You should have mitigated the low limit alarm issue after lowering the RPM settings to 200 – 400 RPM and rebooting your system. If the alarm proceeds, it’s a good indicator that you have a hardware issue and need to replace the fan to prevent damage.
What Causes a 511-cpu Fan Not Detected Error
The 511-CPU error is primarily a product of hardware issues resulting from the actual fan. There are a few things to check for before you consider tossing out your current fan, though.
Loose Connections – Ensure that all connectors are securely connected to the motherboard.Dust – If you haven’t cleaned your PC in a while, it may be the culprit. Unplug everything, go inside and use compressed air and go to work.Damage – Inspect the fans, heatsinks, wires, etc., as these damages could prevent your fan from being detected. Look for signs of damage from falls or wires that might have gotten near moving components.BIOS – Enter the BIOS and change all settings to default.
If you find that you have exhausted all of the previously mentioned steps, it is time to purchase a new fan compatible with your CPU.
How to Mitigate Asus and Megatrends CPU Fan Errors
In most cases, when you see the error message “CPU fan error” in POST, it means the system does not detect the FAN. To mitigate this, follow the instructions below provided by ASUS to eliminate CPU fan errors. ASUS recommends the following steps below to resolve the issue:
Ensure the CPU fan is installed correctly and twist screws tightly.Ensure that the CPU fan cable is installed on the CPU_FAN connector. If you install a lower RPM fan, the system may not detect it, and you need to change the “CPU Fan Speed Low Limit” to 200 RPM in BIOS.Save the changes and then exit BIOS.If issues continue to arise, update your BIOS to the latest version.
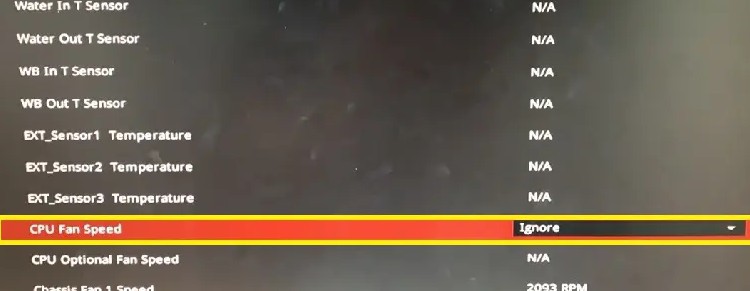
Disable CPU Fan Speed Monitoring on Your Pc
If the CPU fan error appears and the fan is working, you can disable the alarm. Be extremely cautious in performing this step; this removes safeguards to protect your hardware. To disable, follow these directions:
Boot into your BIOS.Go to Advanced settings.Proceed to the “Monitor” section.Change the CPU Fan Speed to Ignore and then confirm your changes.Exit the BIOS and reboot.
Why Is My Computer’s Fan So Loud?
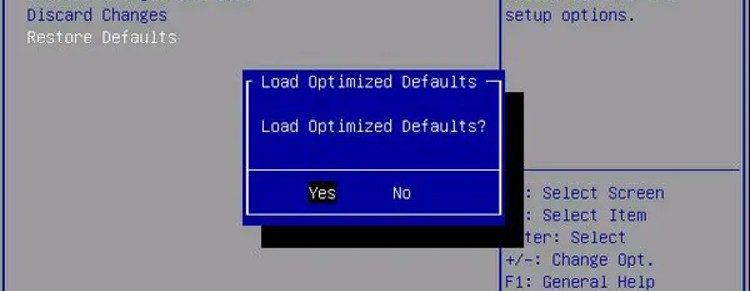
If you find that your fan is much louder than usual, this could be an issue of reduced airflow. The first solution is to ensure that you have proper airflow by checking all the vents and the fans. If you see dirty/dusty vents or fans, most likely, cleaning these with compressed air and 90% or greater isopropyl alcohol can fix this issue rather quickly. If you have cleaned the computer/laptop or the computer is new, and you have a loud CPU fan, it’s time to look at the BIOS. The BIOS ultimately controls your fan. Resetting your BIOS to default will clear any misconfigurations and give you a better starting point to troubleshoot this issue.
Shut down your PCPress F1, F10, or the Delete immediately depending on your chipset and enter BIOS.Choose reset to default and SAVE and EXIT.If you feel uncomfortable working within BIOS, you can reset to default by removing all cables and the CMOS battery. Then press and hold the power button for a minimum of 30 seconds.
By following these steps, your fan should be operating at the default values and making minimal to no noise.
What Causes a Fan to Make a Rattling Sound
If you have a CPU fan making a rattling sound, it is time to shut down the computer and take a look inside. In some instances, a wire might have worked loose or come in contact with one of the fan blades. Other times it could be a piece of plastic or cable tie. Most commonly, it is simply just dust buildup. Odds are, if it’s none of the above, it might be time to replace it. The rattling sound you hear is most likely the bearing inside the fan rubbing and causing damage or already partly destroyed. If the sound just started and it’s covered in dust, try to clean it with compressed air. If the rattle noise goes away, you might have bought some time before it stops working.
What to Do if You Think Your CPU Fan is Failing
If you think your CPU fan is failing, try the following steps:
Check to ensure that the computer is adequately ventilated and there are no obstructions to the air intake.Unplug your computer from both power sources (AC adapter and battery).Remove all RAM modules and any PCI cards, such as a wireless card or TV tuner card.Turn on the computer and see if you still receive an error message.If the error no longer appears, turn off your computer and plug it back into both power sources.Reinsert each of the PCI cards one at a time until you find which device is causing your fan to fail or until you receive an error message again (in this case, replace that particular card).
How to Clean a CPU Fan
Cleaning a CPU fan does not have to be a daunting task at all. It takes only a few tools and can keep your computer running for a long time.
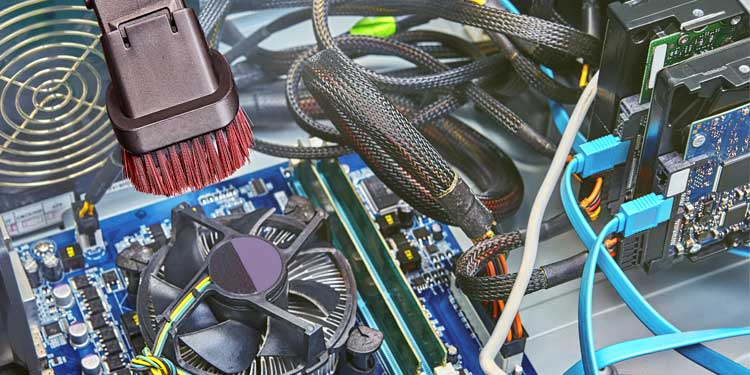
You only need compressed air, isopropyl alcohol 90% or greater, q-tips, maybe a screwdriver if you don’t have a fancy thumbscrew for your side panel on your case, and a little patience.The first step involves using compressed air to clean out the case and all peripherals. Take extra care to clean all the fans, heatsinks, and other components, removing as much dust as possible. I usually spray everything to the bottom of the case and then use a narrow vacuum attachment to remove the dust from the bottom of the case without touching any components.Next, use q-tips with alcohol to get between the fan blades of the CPU fan and the GPU fan. Please do not soak the q-tip; simply dampen it and squeeze off any excess liquid.Verify you are using 90% or higher alcohol to reduce moisture as the higher alcohol level evaporates much faster due to the lesser water content.Once you have cleaned all the components, including your exhaust fans, close your case and turn on your newly cleaned machine.
The CPU fan is integral to any computer. It keeps the processor cool so it can work properly, without overheating issues that could cause errors in performance or excessive noise from moving parts. If the CPU fan error occurs, restart your device and see if it works. If not, follow proper procedures to fix this issue before causing permanent damage to the motherboard or other components of the computer. It may be worth contacting a local technician.